As a mushroom lover, you may be wondering, “Can you grow your own mushrooms at home?” Yes, you can! Here’s a general overview of what to know along with how to get started.
Mushrooms are a type of fungus that can be found in nature or grown in a controlled setting. They have many culinary and medicinal uses and can be grown at home with some basic prep, supplies, and knowledge.
There are many different types, each with its own unique properties. Some mushrooms are toxic, so it is important to do your research before cultivating them at home.
They are usually best grown indoors. Unlike growing in traditional gardening, mushrooms don’t need direct sunlight to grow.
If you enjoy growing your own food, learning how to grow mushrooms at home could provide you with a regular supply of nutrition-packed, kitchen-ready ingredients.
Here I explain how to grow shrooms, including how they grow, what types you can grow and how long they take. I also explain what kind of growing environment is best for them, to help guide you toward mushroom-growing success.
Here’s what to know before you get started.
Stages of Mushroom Growth
All mushrooms generally go through the same phases: inoculation, full colonization, and fruiting.
- Inoculation: You introduce mushroom spores or mycelium (spawn) into a growth medium or substrate. The type of substrate you use can vary depending on the mushroom species. Common options are straw, wood chips, grain, or compost.
- Full colonization: During this phase, the mycelium spreads throughout the substrate, ‘feeding’ on its nutrients. The fungus establishes itself and prepares for fruiting. Depending on the type of mushroom you are growing, it can take from a few weeks to several months.
- Fruiting: After the substrate is fully colonized, mushroom growers often alter the environmental conditions to trigger the mushroom to start producing fruit bodies. These are the actual mushrooms that you harvest.
This could involve changing the temperature, light, humidity, and/or introducing fresh air, depending on the mushroom species. The fruiting bodies then develop, mature, and then ready to be harvested.
Each type of mushroom has its own specific requirements for successful growth, including ideal conditions for each of these stages.
As an example, Shiitake mushrooms thrive in wood-based substrates and have a longer colonization period, whereas Oyster mushrooms are more versatile in terms of substrate and have a shorter growth cycle.
Light for Growing
Mushrooms have minimal lighting requirements compared to plants. They do not perform photosynthesis nor do they need light to produce energy or nutrients. However, light signals mushrooms to start the process of fruiting. Most species need exposure to indirect light (not direct sunlight) or a few hours of artificial light each day during this time.
Popular Mushrooms to Grow at Home
Below are common mushrooms people grow. I’m including approximate days to harvest here as well. Please note, a lot will depend on the quality of the spawn and variables such as temperature and humidity.
I recommend beginners start with oyster mushrooms or button mushrooms because they grow quickly. If you are feeling ambitious, you may also want to consider growing another one (that takes longer) at the same time.
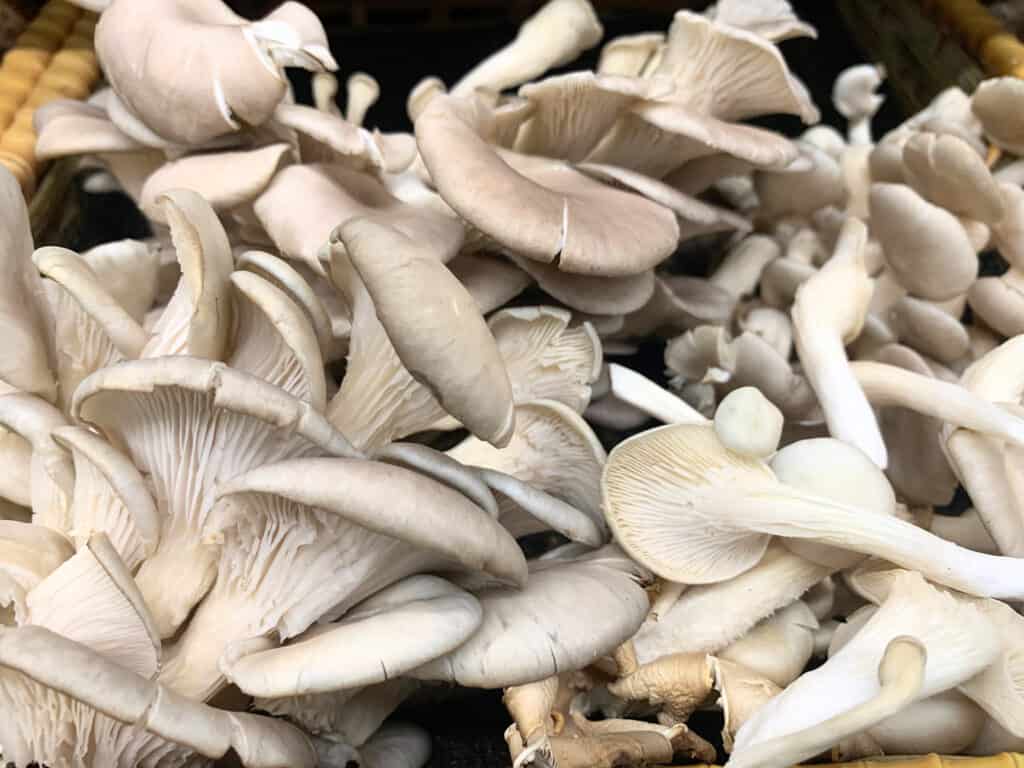
- Oyster mushrooms:
Known for being one of the easiest and fastest-growing mushrooms, Oyster mushrooms can be ready to harvest in 14 to 21 days after the mycelium fully colonizes the substrate.
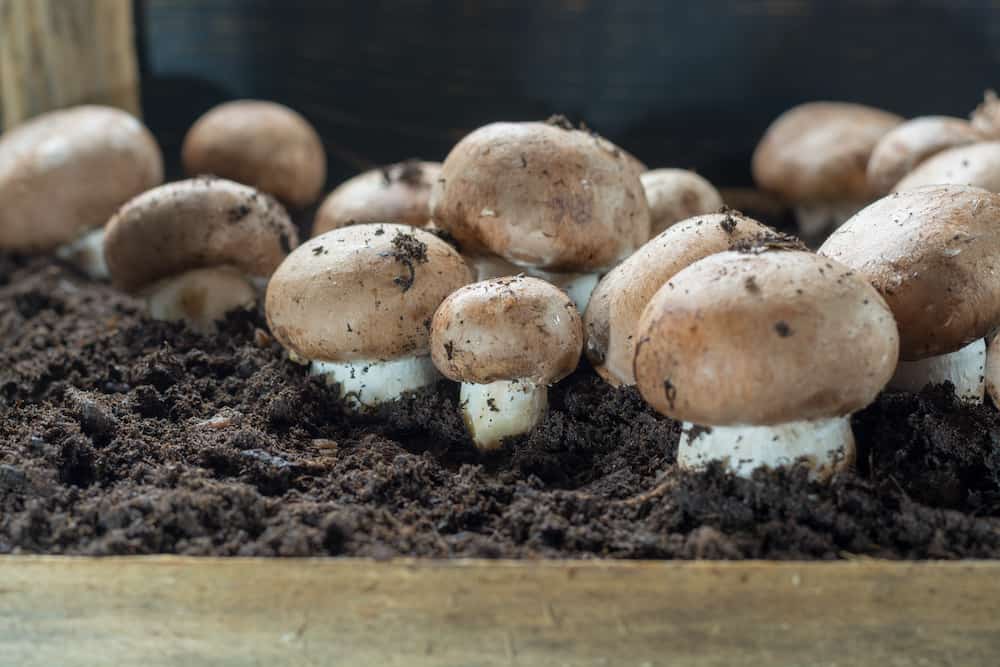
- Button mushrooms:
A common variety found in many kitchens, Button mushrooms take approximately 35 to 42 days from the start of cultivation to harvest.
- Enoki mushrooms: These delicate, long-stemmed mushrooms usually take around 30 to 60 days from the start of cultivation to reach harvest.
- Portobello mushrooms: Essentially mature Button mushrooms, Portobellos take a bit longer to grow, with a harvest time of approximately 40 to 50 days.
- Crimini mushrooms: Similar to Button mushrooms, but harvested at a slightly later stage, Crimini mushrooms take about 35 to 45 days to be ready for harvest.
Each variety has its own specific growing needs and timelines; these are estimates. The actual time to harvest can vary based on factors such as the growing environment, the quality of the spawn, and how well the growing conditions are managed.
I Don’t Recommend Starting With These
Growing mushrooms is different than traditional gardening. Mushrooms are fungi, not plants. They don’t use photosynthesis to grow. They access nutrients from the organic matter in their growing medium.
If you are a beginner, I do not recommend starting with these types. Morels are difficult to grow, and shiitakes take a long time.
- Morel mushrooms: Morels can be quite challenging to cultivate at home. Under the right conditions, they take approximately 10 to 12 weeks to grow.
- Shiitake mushrooms: Shiitakes take around 7 to 18 months to grow, including the mycelium colonization period which can take 6 to 12 months. The actual fruiting and harvesting stage can take a few days to a couple of weeks. However, once they start growing, they will produce for several years.
Are Mushrooms Worth Growing?
If it interests you, then yes. They are considered a delicacy. For the most part, they are easy to grow since they don’t need light, so anyone with a dark, temperature-controlled space at home can give it a go. They are quite different from growing plants.
There are 2,000+ species of mushrooms with around 33 species of edible mushrooms grown in the world. Three are commonly grown:
- White button mushrooms (Agaricus bisporus L.) – The most wild and cultivated edible mushroom representing 40+% of the world bearing of mushrooms
- Oyster mushroom (Pleurotus ostreatus L.)
- Paddy straw mushroom (Volvariella volvacea L.)
Also, there’s a bit of a challenge distinguishing between edible and medicinal mushrooms because some edible varieties also have therapeutic benefits, and you can consume some medicinal types.
Mushrooms are a healthy fungus packed with fiber, vitamins, antioxidants, and other nutrients. They can make a delicious addition to your homemade pizzas, pasta, stews, salads, appetizers, as well as be used as a meat replacement.
Growing Mushrooms
The easiest and quickest set up for growing your mushrooms is to buy a mushroom growing kit. You can find them at a local garden center or nursery. Otherwise, you can buy them online.
A kit will provide you with everything you need, including the right substrate or the ideal surface for your mushrooms to grow on, which will already be inoculated with mushroom spawn.
If you start without a kit, then you’ll need to decide what kind of mushrooms you’d like to grow so that you can source the right substrate for them.
It’s probably best to grow your favorite type so that you can enjoy the fruits of your labor to the fullest. Some of the easiest options include:
- Oyster
- Button
- Shiitake
Mushroom Types and Their Growing Substrates
As mentioned, different mushrooms thrive better in different substrates, so the type of mushrooms you want to grow will dictate what you need to propagate them in.
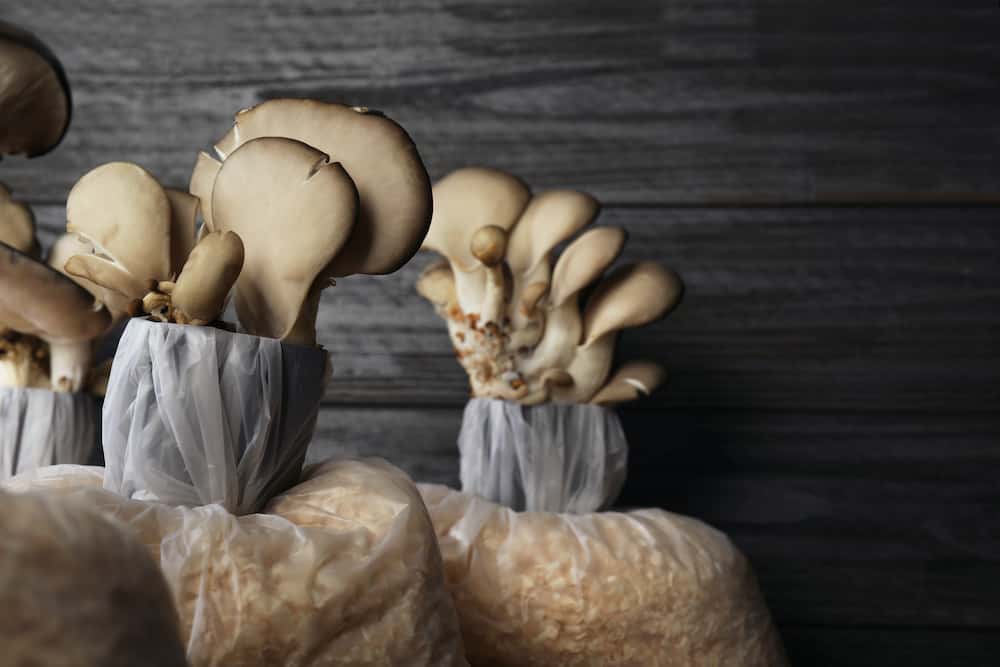
1. Oyster Mushrooms
Oyster mushrooms are saprotrophs; they feed on hardwood and other dead organic matter. They can grow on dead wood inside living trees and can produce throughout the year with good conditions.
You can also use wheat straw, paper, sawdust, cardboard, or coffee grounds. They can go from inoculation to harvest in as little as 3 – 4 weeks, making them one of the fastest and easiest mushrooms to cultivate at home.
If you’re a beginner gardener, I recommend you start with oyster mushrooms first. Options to grow oyster mushrooms:
- You can buy a colonized kit which will have what you need.
- Buy the spawn and then inoculate the substrate in containers or bags.
- Produce your own spawn and then inoculate (for advanced growers).
2. Button and Portobello Mushrooms
Button and Portobello mushrooms are essentially different growth stages of the same species. They thrive in composted manure-based substrates. Ideally, straw mixed with horse manure. If you can access horse bedding being thrown out of stables, that would be ideal.
Their cultivation typically involves a casing layer, which induces the formation of the mushroom’s fruiting bodies. Leave the bedding outside to rot for around three weeks, and you’re ready to move on to the pasteurization process.

3. Shiitake Mushrooms
Shiitake mushrooms are traditionally grown, and thrive best, when grown on hardwood logs or sawdust from untreated wood, preferably hardwood sawdust. They require a longer incubation period than oyster mushrooms, but they offer multiple flushes over several years from the same log.
Mushroom Spawn or Spores
Next up, you’ll need to purchase mushroom spawn or spores. I highly recommend that you buy spawn over spores since you’ll have a better chance for success.
Growing mushrooms from spores takes longer and requires a bit more practice, so it is best left to more seasoned growers.
You should be able to find good quality mushroom spawn online, as well as in some gardening stores, and organic living stores.
The mushroom spawn you buy will most likely be sawdust that has been inoculated with mushroom mycelia, which is the root structure of the mushroom.
What Conditions are Needed for a Mushroom to Grow?
Growing mushrooms at home can be pretty simple, as long as you can accommodate the right conditions needed by the mushrooms in which to grow. When you’re deciding on where to grow your mushrooms, there are some factors that you should take into account, such as light, humidity, and temperature.
1. Light
Growing mushrooms is different from growing any other plant, as they do not contain chlorophyll, so they don’t need sunlight to grow. For your mushrooms to spawn successfully, you need an environment that is as dark as possible, although some light won’t harm them.
When they’re beginning to fruit, they will need a couple of hours of dim light per day.
Mushrooms usually grow in the shade where they thrive off the filtered light, so indirect sunlight will work great, or you can invest in a fluorescent lamp or the best LED grow lights for indoor plants.
Many people find that the basement is an ideal spot to grow mushrooms, as basements tend to have more limited light and are slightly cooler than the rest of the house.
2. Humidity
Mushrooms have no skin, so moisture is easily lost from their bodies. They thrive particularly well in more humid conditions so that they can avoid this water loss.
Their substrate should be moist at all times, but not too wet since it is also possible to drown mushrooms. Many seasoned mushroom growers will often employ the use of plastic bags or sheets to encourage moisture retention.
3. Temperature
Mushrooms tend to prefer cooler temperatures, around 70 degrees Fahrenheit. Wild mushrooms are less fussy, as they’re able to form mycelia in temperatures anywhere between 40 and 90 degrees Fahrenheit.
However, they will usually only begin to fruit when temperatures reach between 50 and 70 degrees.
Mushrooms such as button, portobello, and oyster, are all considered to be commercially-grown mushrooms and are a bit fussier. They prefer temperatures of around 55 – 60 degrees Fahrenheit.
The perfect growing temperature for shiitake mushrooms, on the other hand, is slightly warmer, from 72 to 78 degrees F.
Introducing a thermometer to your growing area will allow you to keep a closer eye on the temperature. This way, you can be sure you are doing everything you can to help them.
How Long Does It Take to Grow Mushrooms?
You’re probably wondering how long it will be before you can start seeing and eating your results. The timing all depends on the type of mushroom you’re growing, as well as how ideal your growing conditions are.
If you’re starting with a mushroom growing kit, then you can expect to see mushrooms forming anywhere from 1 – 4 weeks.
If you’re using fresh substrate and spawn, over spores, oyster mushrooms can reach their fruiting stage in as little as 2 – 3 weeks.
Elm oyster can take up to six weeks, while shiitake may take a little longer.
Generally speaking, your mushrooms will flourish faster if you have your substrate, temperature, and humidity levels just right.
Process of Growing Your Mushrooms at Home
Now that you are with the types of mushrooms you can grow and what conditions are needed for a mushroom to grow, you’re ready to start planting. If you want to grow your own mushrooms, we recommend starting with oyster mushrooms.
Follow our quick and easy, step-by-step guide below to see how you can grow oyster mushrooms on coffee grounds.
1. Order or Buy Your Mushroom Spawn
You can ask around at your local gardening stores, or order your spawn online, whichever you prefer.
Make sure you have the spawn in your hands before moving onto step number two, as the coffee grounds you collect should be inoculated with the spawn that same day, while they’re still fresh.
2. Find Coffee Grounds
You’ll be using these coffee grounds as your growing substrate, so you’ll need enough to fill up your growing or cultivation container.
If you don’t drink coffee, or anywhere near enough, then pop by a local cafe and ask if you can have theirs. A busy cafe will probably be able to give you the amount you need within a day.
The beauty of using coffee grounds as your substrate is that there is no need to pasteurize it before inoculating it with your mushroom spawn.
Pasteurizing your substrate kills off all microorganisms living within it, which your mycelium would otherwise have to compete with.
The brewing process already pasteurizes fresh coffee waste, plus they contain tons of nutrients that would otherwise have ended up in the trash.
3. Inoculate Your Substrate
The more mushroom spawns you mix with your substrate, the better chance of success you’ll have. Remember, you need to mix your spawn with your coffee grounds the same day that you get the used coffee grounds.
Otherwise, you run the risk of them becoming compromised, and they may produce green mold in the cultivation process.
We recommend that you start by using a ratio of around 1:5, spawn to the substrate. If you have 2.5kg of spent coffee grounds, then use around 500g of your oyster mushroom spawn.
After washing your hands and arms to avoid contamination, mix the mushroom spawn into the coffee grounds in a large clean bowl.
Break up the spawn and distribute it evenly throughout the grounds.
4. Cultivate
Next up, you’ll want to load up your spawn and grounds into something suitable for the cultivation process. Ask your local gardening store if they sell filter patch grow bags.
If you don’t have access to a filter patch grow bag, then you can use an empty ice cream container or a large freezer bag.
Wash your container, if it’s not brand new or clean, and cut four x 0.5mm holes into the sides. Load up your mixture and seal it shut at the top.
Place your bag or container somewhere warm, around 70 degrees Fahrenheit, for three weeks, in which time the spawn will come to life.
An airing cupboard or heated room is an ideal spot for this, and you’ll see the appearance of the coffee grounds change from day to day.
The whole coffee grounds mixture should turn white by the time the spawn has fully colonized it.
5. Fruiting
Now it’s time to place your growing container on a shaded windowsill or worktop, or down in the basement, whatever location you have picked out for it.
Cut a hole in the top of your container or just take the lid off and spritz the area with water a couple of times per day, being careful not to let the soil dry out.
Remember that mushrooms thrive in damp, humid conditions, and they just won’t grow if it’s too dry.
As per how long does it take to grow mushrooms, it will probably be around a week before you start to see little mushrooms start to form on the surface, Then over the next week, they will literally double in size every day.
You’ll know that your mushrooms are ready for harvest when the edge of the oyster caps start to turn upwards. Cut the mushrooms at the base of their stems with a sharp knife and enjoy.
6. Troubleshooting
If you followed all of the steps above and didn’t get results, then we’re sure you’re keen to know why.
The three most common things are the substrate not turning white during the cultivation process, green mold patches appearing, or just no mushrooms growing at the end.
Substrate Didn’t Turn White
If your substrate didn’t turn white after three weeks in the warm, then there must have been a problem with your mushroom spawn.
Substrate Developed Green Molds
If your mixture starts developing small patches of green mold, you can try adding a little salt to the area to kill off the bacteria living there.
If the whole bag goes green then, again, it probably has something to do with poor quality spawn, or mold spores infected the coffee grounds.
In this case, we’re afraid that you have to throw the whole thing out and start again.
Mushrooms Didn’t Grow
If the cultivation process seemed to work, but it still didn’t fruit you any mushrooms, then you may have let the soil run a little too dry.
Either that or maybe the growing area you have for your mushrooms isn’t as ideal as you hoped it would be.
Mushrooms will enjoy fresh air, but will not respond well to an area that is too drafty. The next time you try, change the location you’re growing them in.
Growing Mushrooms
So, now you know how to grow shrooms, which type are you going to try first? If you’re feeling a bit unsure, remember that you can always start with a mushroom growing kit to see how it all works.
If at first, you don’t succeed, don’t let it put you off trying again. Growing your mushrooms at home is affordable and easy, especially once you’ve established your growing environment, substrate source, and good quality spawn.
Once you’ve grown your first successful batch, you may feel more confident for the next time. You may want to try another variety.
There are many types of edible mushrooms you can grow. When you buy a mushroom cultivation kit, you will acquire an understanding for how they grow and have what you need to begin growing mushrooms.
Growing mushrooms is a rewarding experience. It is a great way to get introduced to the world of fungi. You can eat them fresh or dry them to enjoy year round for a valuable source of food. It is also a fun project to do with kids. With a bit of time effort, knowledge and experience from trial and error, you can learn how to grow them at home.
Awesome Guide! Thanks for putting this information all together! I especially like the troubleshooting section at the end, good info in there that is absent from many other mushroom growing guides.