Having a lawn aerator at your disposal can help you to improve your landscaping drastically. An aerator will help maintain your lawn by leaving small holes in it. Learn why aeration is necessary and how it helps with soil compaction.
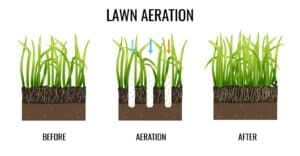
Lawn aeration is the process of perforating the soil with small holes in order to allow oxygen, water, and nutrients to reach the grass’s roots. This is an important step in keeping your lawn healthy and looking great. Aeration also helps reduce thatch build-up, improves drainage, and can even help control pests.
Do You Need to Aerate Your Lawn?
Every lawn can benefit from aerating, especially if it’s never been done before. With regular aerating, you’ll have the ability to build more reliable and resilient turf.
Over time, the more that your grass is walked on, the more compacted the soil becomes. This can cause nutrients to be blocked from penetrating the grass roots, causing it to die quickly.
By taking the time to aerate, you’re loosening the deeper soil so that air, water, and nutrients can travel more freely. It’s pretty easy to determine whether your lawn needs to be aerated if it falls under one of the following.
Heavy Use
If you have children, pets, or if you like spending time outdoors, your lawn can benefit from aeration. Even lawn mowers contribute to soil compaction. The more often your yard is used, the more compacted the soil under your grass will become.
Even in your front yard, if passers-by tend to walk on your yard, it might be something to look into.
Heavy Clay Soil
If your property has heavy clay soil, which contributes to a compacted lawn, it will benefit from core aeration. It will help to improve drainage as well as help the soil get more oxygen and the grass more nutrients.
Before Planting Grass Seed
Aerating the soil before putting down grass seed will help ensure the seeds are mixed in and aren’t on top.
Thatch
Lawn thatch is a layer of living and dead shoots of grass, roots, and stems that will develop between the soil and the lawn.
Typically, thatch will begin to build up over the winter, although it can appear throughout the year. The issue with thatch is that it produces debris faster than it breaks down, which can cause an overwhelming problem.
If your lawn is dealing with thatch concerns, you can guarantee the nutrients in the soil aren’t getting to the roots as they should.
Some thatch is useful for protection against inclement weather, but too much could become an issue.
To determine if your lawn has too much thatch, you should check to see if it feels spongy and dries out quickly.
If so, you’ll first need to take a shovel to remove most of the thatch, leaving about a half-inch layer behind for protection. Afterward, you can use a yard aerator to help promote the spread of essential nutrients.
New Construction
For homeowners who have purchased new homes, your builder most likely didn’t use a yard aerator. The topsoil used for newly-built homes will most often be buried or stripped of essential nutrients. Plus, the added disadvantage of construction traffic continually compacting the soil.
To help make your newly laid sod develop healthier roots in less time, aerating is a fantastic choice.
Another issue with newly constructed homes is how sod is put onto the ground. Sod has a layer of fine soil that is then spread across the coarser ground that preexists on your property. When dirt is layered, it disrupts the flow of water through your soil. This process makes it much more difficult for your grass to absorb water.
What Is the Best Tool to Aerate Your Lawn?
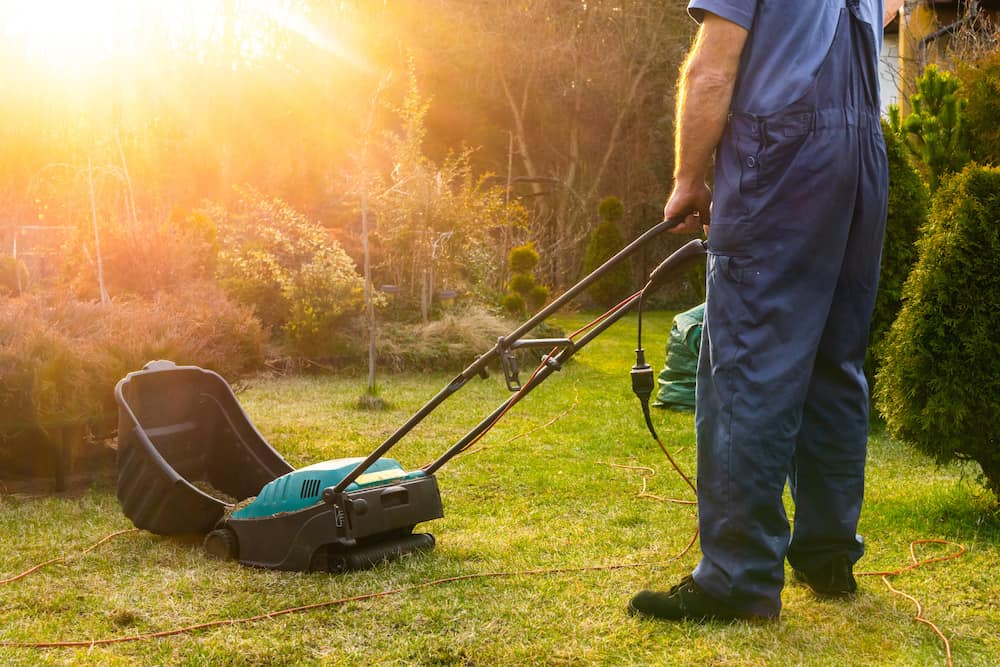
There are two main grass aerator tools to choose from. Instead of hiring a professional landscaping company, these are an excellent investment. The tools also allow you to manage your property independently and aerate your lawn whenever you have some time.
The most popular is a spike grass aerator. It will spike holes in the ground. A core aerator is also a good choice, it will create extract soil cores from the soil. The downside to this model is the soil cores will remain on the lawn until you break them up or they decompose.
Before buying, check to see how many holes per square feet it will make. Ideally, it should create at least 20 per square foot.
Spike Aerator
When you use a spike aerator, it will put holes into the ground as you push it across your property. They are good for loose soil.
You’ll notice many spikes, also known as tines, that will push themselves into your lawn as it rolls. The purpose of this tool is to loosen the soil without removing any of the earth.
Spike aerators are an excellent choice for property owners who need short-term de-compaction of their soil.
You can easily find these devices from any home improvement store, and they are typically affordable. They’re the ideal option for small yards and are very easy to use.
You might also want to consider a spike aerator if you have recently plug-aerated your lawn. It might not be necessary to plug aerate two seasons in a row, which is why the spike aerator could be a better intermediate option.
You can easily find spike aerators specifically designed to dig deep. Many models can reach up to nine inches of depth without making your grass look messy.
Also, spike aerators don’t leave the plugs behind afterward.
Models to consider. They are available at Lowe’s:
- Agri-Fab 40 inch Spike Lawn Aerator
- Brinly 40-in Spike Lawn Aerator
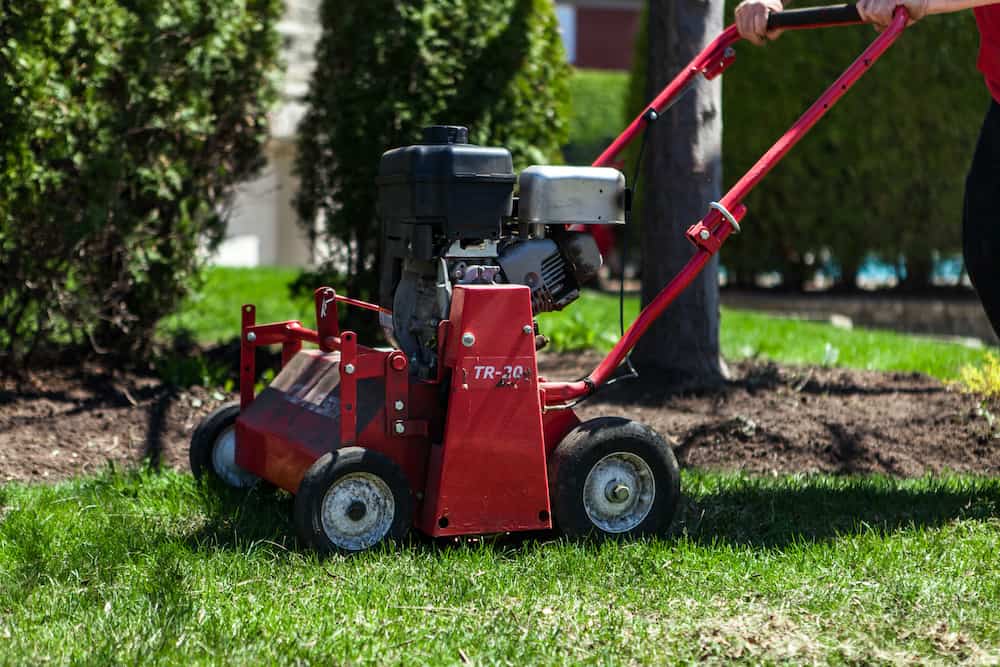
Core Aerator
Another option for lawn aeration is to use a core aerator which is also called a plug aerator. These machines are designed to loosen the soil with removal. When using this tool, you’ll be removing soil cores, or soil plugs, from your lawn.
Many find that core aerators provide a more long-term solution and are fantastic for excessive thatch.
A plug lawn aerator will dig deep into your lawn, removing grass cores and plugs of soil simultaneously. They certainly look different from spike aerators in that their tines are hollow and cylindrical.
Another advantage of plug aerators is that they are beneficial for all property sizes. If you have large areas that need soil de-compaction, this could be your best option.
The big disadvantage to this type of aerator is the soil cores which will be left behind.
Models to consider. They are at Lowe’s:
- Agri-Fab 40-inch Plug Lawn Aerator
- Brinley 48 in. Tow-Behind Plug Aerator
Manual vs Powered Aerators
Apart from deciding between spike and core aerators, you might also need to choose between manual and powered models.
As with any lawn equipment, you’ll find that powered units are far simpler to use, but they are also more expensive.
Manual Lawn Aerators
Manual aerators are the budget-friendly choice for households that don’t want to spend too much on their landscaping. The downside is that you’ll have to put in more work.
1. Aerating Shoes
Lawn aerator shoes are plates that strap to your regular outdoor shoes and have deep spikes on the bottom. You may have seen a neighbor with these unique footwear accessories before.
With these, you won’t be extracting soil plugs. Instead, as you traverse across the lawn, the spikes will dig into the soil and attempt to loosen them. They’re not the most effective option as you’ll be making a lot of back and forth motions.
Often, aerating shoes won’t penetrate the soil properly, and you run the risk of missing specific sections of grass.
You’ll have to put a lot of pressure on the shoes for them to penetrate your turf. Still, they are the least expensive option on the market, likely because they require a lot of work.
These work best for small lawns or certain areas you want to aerate. It’s also best for lawns without clay soils.
2. Manual Drum Aerators
Also referred to as lawn spikers, manual drum aerators are a slightly more expensive option. These will have a drum covered in blades with an easily accessible handle.
You’ll need to push it across your lawn, similar to a lawnmower, though you’ll have to make multiple passes. Most manual drum aerators are spike aerators, though some also remove plugs.
Your forward motion propels the drum to move, rather than electricity, but they’re much more straightforward than aerator shoes.
3. Handheld Aerators
As a fantastic option for small lawns, handheld aerators are quite affordable and convenient.
Similar to manual drum models, these are mostly found in spike configurations. Even though they’re simple to use, it can also be time consuming and exhausting.
You will need to manually stab the handheld aerator into the ground, pull it out, and repeat the motion for your whole lawn.
With that said, this is an excellent option for spot treating small areas, but certainly not ideal for large properties.
Powered Lawn Aerators
Larger lawns and big properties will benefit more from using a powered aerator.
1. Gas-Powered Aerators
These tools look identical to lawnmowers, but they operate quite differently. Gas-powered units will have spikes that spin quickly to aerate the soil.
You might also find that they have plenty of other jobs, such as dethatching simultaneously.
Gas-powered aerators are more expensive than manual options but are still quite affordable. The main downside is that you will have to manage the gas and oil levels to make them work.
2. Pull-Behind Aerators
At first glance, pull-behind models look quite similar to manual drum models. However, instead of using your strength to power the tool, pull-behind aerators do the work.
These models are very heavy-duty and typically need to be attached to machinery, such as a riding lawnmower.
Although they might not be an option for small to midsize lawns, they are a phenomenal option for large properties.
Also, because they are heavier, they will do a far more effective job at dethatching and penetrating your turf.
Best Tool for Aerating
Deciding on the best tool to aerate lawns will depend on your property size and needs.
- Spike aerators are very easy to use but will need to be used seasonally or multiple times per season.
Because they offer a temporary solution by putting small holes into the soil, it’s a quick solution.
- Gas-powered plug aerators are typically seen as the preferable solution as they have the most prolonged effects.
Also, it not only helps to make certain nutrients flow properly but ensure thatch is removed, as well. The main issue with plug aeration is that there will be plenty of maintenance afterward.
Alternatively, you can leave the plugs on your lawn, and they will dissolve into the grass over time. The nutrients from the plugs will break down and reinvigorate your lawn, even if it appears unappealing.
When Should I Aerate My Lawn?
Knowing when should I aerate my lawn is very important, as it will have a significant bearing on your success.
If timed improperly, aerating can cause undue stress to your grass and cause it to die quickly. This is why it’s recommended you never aerate lawns that are in dormancy.
The main factor that will determine when you should aerate is the type of grass you have. It’s also important to note the current weather in your area, as you’ll want to have ideal timing.
If you have a large project in front of you, you’ll want to aerate before your grass reaches its peak time for growth. It’s important to know there are two types of lawn grasses:
Cool-season grasses
Cool-season grasses will be best suited with aerating in the early fall or early spring. Some examples are:
- Ryegrass
- Fescue
- Bluegrass
Warm-season grasses
If you have warm-season grasses, you’ll want to aerate in the late spring. Some warm-season grass types are:
- St. Augustine
- Bermuda grass
- Zoysia
Knowing the perfect timing based on grass type can help ensure it has the highest chance of being healthy.
Another top recommendation is to give your grass one full year of growth before aerating. This is important for new homeowners, as it might be tempting to aerate upon gaining possession. Also, aerating at specific times can help to manage the amount of thatch that appears beneath the surface.
Fortunately, aerating isn’t needed regularly, especially because it takes a lot of traffic for soil to compact.
Most households can get away with aerating every two to three years, at most. If you aerate too often, you’ll also be putting undue stress on your lawn. This makes it a doable project without needing to call a lawn service.
There are exceptions, however, such as homes in harsh climates or that have frigid winters.
How Can I Aerate My Lawn Cheaply?
There are plenty of affordable ways to aerate lawns, especially if you want to do it yourself. Many homeowners prefer to hire professional landscapers, but it’s a job that anyone can do with the right equipment.
Not to mention, over time, you’ll find that it will become less time consuming with more experience. Here are a few essential tips to help you get started with your aerating your lawn:
1. Water and Mow Beforehand
It’s best if you take the time to plan your schedule so that you can prepare adequately. Ideally, you will want to water the grass a couple of days before you aerate your lawn. It’s also essential you mow your grass so that it is half of its average height.
2. Mark Locations of Yard Equipment
Take note, you don’t want to do run over your underground sprinkler system with an aerator.
It is highly recommended you use chalk or flags to mark the yard equipment that you can’t remove. This can be time-consuming, but it can help you save a lot of effort in the long run.
3. Remove Debris
Another critical step in preparing your lawn is to take the time to remove any debris. The cleaner your yard is, the easier it will be to make multiple passes, if necessary. You’ll want to make sure you get rid of any leaves and twigs. Also be sure to remove dog poop.
4. Focus on Compaction
If you have specific areas of your lawn that see the most traffic, they are likely to be the most compacted. You’ll have to allocate most of your time on these areas, as you might have to aerate that section multiple times.
Most machines only tackle small slices of property at a time, so you might have to make several passes.
5. Know Your Lawn
Knowing your lawn is essential to many tasks, especially aerating. You will need to know your grass type to discern when to aerate and whether the soil is loose or not. Loosely compacted soil may require multiple passes, as will highly compacted ground.
How to Aerate Lawn
Now that your yard has been prepped, let’s get into the details of learning how to aerate lawn. When possible, save the lawn care experts for bigger jobs. Aeration may be something you can do yourself.
1. Prepare the Aerator
To aerate your lawn, you’ll want to make sure you choose a powered aerator to make the job easier. You could use a manual device, but the cons far outweigh the benefits of investing in an affordable powered aerator rental.
Ensure all of the gas levels in your equipment are ready for the length of your project, as well as the oil levels.
- If you have an electric model, get access to an outdoor extension cable to help you reach your entire yard.
- If you own a battery-powered model, ensure that the batteries are fully charged.
2. Aerating the Lawn
Fortunately, aerating is pretty simple as soon as you turn your machinery on. You’ll want to make sure you run the aerator over your lawn in the most efficient pattern possible. This is particularly crucial with plug models, as you won’t want to remove too many cores.
Ideally, the pattern should allow you to move across the lawn once rather than doing multiple passes. However, if you know you’ll have to go over the same spot twice, make sure your second pass is perpendicular.
If you’re looking to save time, you can typically rent two aerators at a low cost. Instead of tackling the entire project yourself, recruit a friend or family member to do one half as you do the other.
3. Finishing the Lawn
Once you have sufficiently aerated your property, it’s time to apply the finishing touches. Most homeowners prefer to leave the plugs on their lawn, as they provide more nutrients to the soil. In most cases, the plugs should be fully dissolved within two to three weeks.
You will also want to consider sprinkling compost or sand over your lawn to fill in the holes.
Another essential task is to make sure you seed your lawn and apply any fertilizer, as needed. As the soil will be less compact, this time is ideal for inserting more nutrients into your grass’s roots.
Lawn Aerator: Why You Need One
There’s no better way to promote the healthy growth of your grass than to have an aerating schedule. Also, with the right equipment, it shouldn’t be an overwhelming at-home project. Using a lawn aerator, you can have hardier and healthier grass to show off to the neighborhood.
You’d just have to make sure that you choose the right type and model of lawn aerator to match your lawn’s size and specific needs.
Using a lawn aerator and using natural lawn care tips will get your lawn in the best shape possible. It takes work but you will enjoy the results.
- Tips for Starting and Growing Your Lawn Care Business
- Using the best lawn edger to groom your lawn
- Calcium Nitrate for Plants: Yay or Nay
- Best Weed Killer Complete Reviews With Comparisons
- Best Battery Powered Lawn Mower – Complete Reviews